 |
| Add caption |

Wrap 26 gauge wire around the three support wires. The three wires need to stay flat and parallel. You can use blue painter's tape on either side of where you intend to wrap to hold the wires in place. Trim off the ends ensuring that they are both on the same side of the main support wires. Tap down the ends with your soft jaw pliers.
Now you may begin to form the wires around the cabochon or focal bead. This is an initial general shaping.
Holding the first bind in place with your soft jaw pliers, bend the front outside wire to angle against the bind.
Then repeat on the other side of the same wire
Bend the same wire back toward the outside and repeat on the other side of the same wire. This wire will be the support for the front side of your frame.
Repeat the same steps with the opposite wire. This will be the support for the back side of your frame.
The center wire will follow the perimeter of the stone and be the contact point for where the front and back wires will be joined together, holding in the stone.
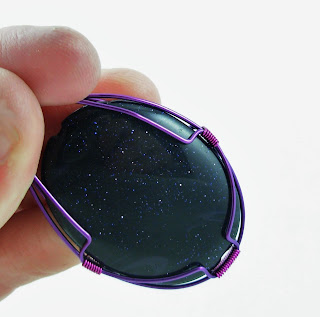
Now is a great time to slip the stone in the frame and adjust fit.
You'll need to make a secondary bind on either side to hold the stone in place.
You will find that it is a little more challenging to keep the frame wires side by side and flat. You can use painter's tape to hold the wires in place. It is always helpful to tap the wires flat with the soft jaw pliers. This will flatten the wires in the bind.
You may find it easier to make the bind further from the bottom and then slide it into place.
Then it is time to check and adjust the fit again.
Next, bend the outer wires apart that will form the upper half of the frame.
Since these wires will end up bracing the stone, I bend them at a 45 degree angle, rather than straight out.
Then bend wires up toward what will be the top of the stone.
Check the fit and make adjustments.
If you are overzealous when you are trying to get a tight fit on the stone, you can bend or kink the wire.
Take the time to carefully straighten each wire using the soft jaw pliers. It is worth taking the time to fix the problem while you have the chance to do it without the stone in.
This is an awkward part. Bend the wires over the top of the stone and then angle up where the wires pass over the center of the top of the stone. Then repeat on the other side.
You may want to tidy up your binds. Do this with care. As you can see, I chose to do this with my bent nose pliers and ended up scraping the color off when I squeezed too hard. Try instead using a tooth pick or your fingernail which won't result is poor craftsmanship.
At this point, it's not too late. Unwrap the damaged wire and replace it with new. Take the time. Have standards.
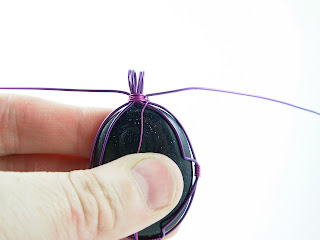
When you get the fit you like, tie off the frame wires with 26 gauge wire.
I can see already that I have made the binds uneven. The left one is lower than the right. So, I will have to use other tactics to balance this design.
Spread the wires in preparation for making the bail. I am choosing to make a bail with four wires. But, you can choose any number from one to six. You will have to continually tighten the tie. I try to keep the wires that went around the stone on the right, to the right side of the bail and the left to the left.
Make a bend toward the front of the stone 45 degrees, more or less, with the wires you have chosen to use for the bail.
Then, find something like a dowel or an ink pen to for the wires evenly around. I had a dop stick laying on my table, so that's what I used.
Make a bend outward where the wires align with the top of the stone. This will make tying the bail off easier.
Twist the wire, and then trim to about a quarter inch.
Note, if you twist it too tight, the wire will snap. If this happens, the tie is compromised and must be removed and replaced.
You may find it helpful to put the dowel back in the bail to stabilize the cage while you replace the tie.
As it turns out, the second time binding the tie turns out better.
I decided to add some beads to bring out the magenta wire. Beads are a great way to hide an untidy mess, should that occur.
With the extra wire from tying off the bail, I chose to wrap one of the free wires. My plan is to try to balance the fact that one bind is lower than the other and there is a gap in the binding on the right. What you do with the design can hide some missteps in the earlier planning.
Testing out what I might do with the decorative wire so that I know when to stop wrapping it.
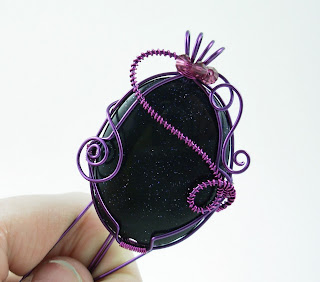
This design element instantly balances the mismatched side binds.
I decide to anchor the decorative element on the back. I trim the wire on the stone side so it won't snag clothing.
The other end of the tie wire, I just wrap around one of the back wires and trim off toward the stone.
Making a nice spiral.
This curly cue will have to be tapped down with the soft jaw pliers.
You can see from the front that the design is now balanced. However, there is a bit of light coming through at the bottom where that hole was drilled.
I like the design and don't want to do much more. So, it is safe to trim off a couple wires.
I leave one wire uncut until I am sure that the wire I am planning to fill the hole with is going to work.
Wire through with no damage, so I am free to trim the remaining wire.
I curl the trimmed ends so there are now edges or ends sticking out to snag on clothing.
Finished! YAY!
I wrote this so that the folks who really need lots of pictures and explanation will have the help they need. This is not intended to teach this design. It was intended to teach the concept and help deal with problems that come up as we make things. I hope this will help many.
Cheers...


