Welcome to Cello Carrots! All about jewelry and the creative habit. Thanks for stopping by!
Monday, August 15, 2011
Wire weaving 101
Because so many have asked.
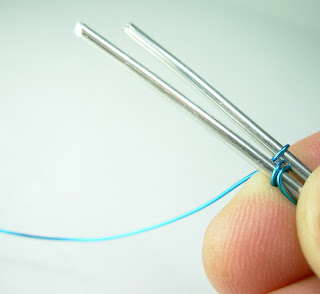
*For your very first weaving, I suggest you use a very large gauge wire that will be stiff and easy to handle for your two base wires. Here I have used 10 gauge aluminum. I have chosen 24 gauge aqua color enamel coated copper wire so you can easily see the process.
* The direction of the wire when weaving on two wires will be, from the outside, over the top, through the middle, under the back, coming back to the outside, then around the outside and over the top, through the inside and ACROSS to the back of the 2nd wire, around the outside, over the top of wire 2, through the middle, around the outside of wire 2 again, through the middle and ACROSS the back of wire 1, and so on....
* You may want to use a piece of blue painters tape to hold the two main wires in place when you first start the weaving. I always do this if I am starting a piece of weaving where the wires aren't already attached to the piece I am working on. Once you get the weaving started, you can remove the tape.
* Starting the weaving near the ends of the wire gives you more control from the very beginning. Once you get going, you can gently pull each wire through to get the actual weaving positioned where you want it on the two main wires.
* To keep the weaving even and tidy, push each wrap down so that it is nested right next to the previous wrap. If a wrap looks kinked, crooked, or generally bad, unwrap it and straighten the wire to your best ability. Then wrap again, pushing the wire into place each time. Dealing with a mistake right when it happens is necessary, as it is nearly impossible to go back and fix it later without messing up the wires around it.
*Before I make each wrap, I pull the wire through my fingers to make a nice stiff, straight line before I cross to the other wire. This adds to the tidiness of the overall weave. If you are working in sterling. Try not to overdo it, sterling work hardens very quickly, and trying to weave with hard wire is difficult, to say the least.
* I do all my weaving exclusively with my fingers, not tools. Tools will leave marks, and marks are unattractive.
*When you go to do weaving in a piece of wire jewelry, a common combination is to use 20 gauge wire for your design, and 24 or 26 gauge wire for your binding and weaving. Or, if you are working on something fairly small, you might choose to work with 22 with 26 or 28 gauge, or 24 with 28 or 30 gauge. I would suggest using magnification for your eyes if you are working with 22 gauge or smaller for your main design wire. Particularly, if you are not using contrasting colors of wire.
***WIRE SOURCES
I buy most of my wire locally now. But, when she is out of what I need, I purchase most of my wire from Fusion Beads. I have tested many different companies wires, and I find that the quality of theirs is outstanding. Here's the link. http://www.fusionbeads.com/shop/category/23/Jewelry_Wire/
Rio Grande is another great source. And if you are interested in metals of special alloys, I suggest United Precious Metals.
*** If you have any questions at all about this basic weave, please feel free to email me at dblairster@gmail.com.
HAPPY WEAVING!!!
Subscribe to:
Post Comments (Atom)


9 comments:
For those of you who try this for the first time, based on my instructions and photos, please let me know if you felt this was complete enough instruction for learning to weave wire. I plan to publish more and different weaves here as well, because learning how to weave wire should not be any big secret. While copying people's designs and design styles is very, very bad. I think sharing techniques openly is important.
Since, I am asked so often for tutorials on how to weave, I have just decided I will publish them for free here. It isn't the same as learning in person. But, if you pay attention to what you are doing, you should be able to get the same lovely result. Thanks for stopping by ;-)
Dawn
Great post!!
Thanks for sharing your tips and pictures. They are greatly appreciated.
Dale London Corpus Christi, Texas
Reminds me of the Hairpin Lace I used to make with yarn and then weave strips together to form Shawls or other pieces of clothing.
Hugs,
Terrie
This tutorial was awesome! I was especially impressed by the photos. I could figure out what you were doing just by looking at those, which is good because some people are more visual learners.
One thing? I'd like to know how you tape your wires. Do you wrap it around them like a kind of sticky binding wire, or do you tape them to the table or other workspace? I've seen people do both. I'm wondering which works best.
Again, great job!
Nice post Dawn!
Great tut, Dawn! Thank you!
Thanks so much for taking the time to share your wonderful tutorial, Dawn. It is very clear and informative, and the pictures are great! Will try this soon and let you know how it went. Thanks again!
Thank you, Dawn!
Post a Comment